
")
This article shows you the commands required to set up an Apache web server on a fresh Ubuntu Linux installation from a Command Line Interface. It goes through the steps to setup PHP and MySQL and link both to the Apache web server.
It doesn’t just finish there though. I also cover installing OpenSSL for managing secure certificates, VSFTP for file transfer protocol accounts and the GD PHP image library. These are popular things to do for say running WordPress but not essential to a LAMP (Linux, Apache, MySQL and PHP) setup.
The examples use Ubuntu 14.04.4 LTS (Long Term Support) but could easily be performed on any recent Ubuntu version.
Throughout this article I will assume that you are running under a non-privileged account that has sudo access so all commands will be prefixed with sudo when appropriate.
Preparation
Before installation it is always best to make sure you have the latest updates.
sudo apt-get update

Apache install
Install apache by entering the following command then “Y” to continue when prompted.
sudo apt-get install apache2


Apache should install and then start automatically. You should check Apache is running by entering the IP address of your server in a browser.
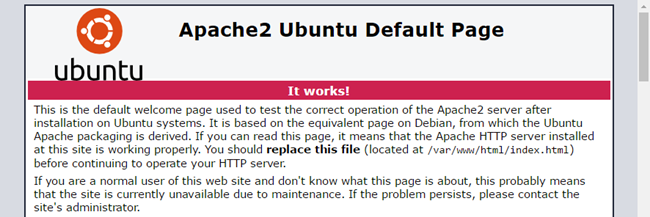
It is a good idea to replace this default web page either by deleting it and replacing with a proper website or in the case of a multiple website hosted environment where you don’t necessarily want a default website for your IP address, just modifying it for now so that it does not give away any unnecessary information.
To do that, navigate to the default website directory in the CLI by changing the directory and then editing the default page using the nano editor (or another preferred editor).
cd /var/www/html

sudo nano index.html

In nano, delete rows by using Ctrl+K and when finished editing use Ctrl+O to save as index.html and Ctrl+X to quit nano. In the example I just left a simple message in a minimal HTML5 page.
<!DOCTYPE html>
<html>
<head>
<title>Welcome</title>
</head>
<body>
<p>There’s nothing to see here</p>
</body>
</html>

Refresh the page in your browser to make sure no server details are shown.

PHP install
Install PHP 5.5 by entering install command for php5 and then “Y” to continue if prompted. In the example I’ve also changed the directory to the root of the server by using “cd /” just so that I’m not in the default websites folder.
sudo apt-get install php5


MySQL install
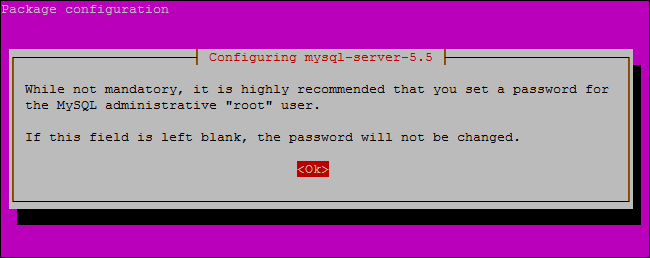
Install MySQL 5.5 by entering install command for mysql-server and then “Y” to continue if prompted.
sudo apt-get install mysql-server


Hit Enter on the first message to accept OK. Enter a password for the root user account and hit Enter. Then repeat it on the next screen. MAKE SURE YOU REMEMBER (WRITE DOWN) THE ROOT PASSWORD.


When finished you will need to allow PHP to talk to MySQL by installing php5-mysql.
sudo apt-get install php5-mysql

You will need to allow Apache to talk and authenticate to MySQL by installing libapache2-mod-auth-mysql.
sudo apt-get install libapache2-mod-auth-mysql

Note: I have not installed phpMyAdmin web-based tools as this is a production server and I want to reduce possible ways into the system. I would recommend you adopt the same policy on production servers and keep phpMyAdmin or other tools for your development environment.
OpenSSL
Install OpenSSL by entering the install command for openssl and then enabling it in Apache (although you might already have the latest version already installed but there’s no harm in issuing the command).
sudo apt-get install openssl

sudo a2enmod ssl

Then restart Apache.
sudo service apache2 restart

Install FTP Server for user accounts
If you need to host WordPress and allow it to update, you’ll have to do that via an FTP user account (no tokens for authentication through WordPress). Start the process by issuing the install command to vsftpd.
sudo apt-get install vsftpd

Next you will need to edit the configuration file (/etc/vsftpd.conf) using a text editor such as nano.
sudo nano /etc/vsftpd.conf

Remove the # from the front of the “write_enable=YES” and “chroot_local_user=YES” lines in the editor and save, Ctrl+O and quit nano, Ctrl+X.


Other modules
That should all now be set up and ready to have websites added.
However, some websites will require that rewrite and headers modules are enabled so let us enable that in Apache.
sudo a2enmod rewrite headers

You will need to restart Apache for it to take effect but before you do you might as well add in a couple of popular PHP modules too. Some websites require additional libraries such as GD and FreeType to cope with captcha generation so it’s a good idea to include those. You can install and enable these in PHP by issuing commands to install php5-gd and freetype accepting that you want to continue before restarting Apache.
sudo apt-get install php5-gd


sudo apt-get install freetype*


sudo service apache2 restart

You should now test GD is working by issuing the following command to check one of the GD PHP functions is working.
php -r “var_dump(function_exists(‘imageantialias’));”

If this returns “bool(true)” then GD is installed correctly and this process is complete, if it returns “bool(false)” (as in the example above) follow the steps in this article to fix the PHP GD library.

Related articles
This is part of a series of short articles covering setting up and maintaining a multiple domain web hosting environment using an Ubuntu Linux server. You can find an up-to-date list of those from the Hosting – Ubuntu category.